Install uKnit
The preferred and the easier way to use uKnit is to add it as dependency in your project pom as explained in Quickstart.
uKnit is also distributed as release zip which contains uKnit core and a Quickstart example project. The uKnit core is a Maven project which needs to be in your IDE workspace along with the project for which you wish to generate unit tests. Install uKnit only if you don’t want to add uKnit dependency to your project’s pom for some reason.
    uKnit needs Java 11 or higher, ensure that
    Java 11 or higher is installed in the IDE.
Download the latest uKnit release from Uknit Releases. Installation process for Eclipse and IntelliJ IDEA is explained below and the procedure is more or less same for other IDE.
Eclipse
Extract the downloaded uknit-1.0.0-M2-release.zip in the eclipse workspace which results in two folders uknit and quickstart. Next import the uknit folder as a Maven project with Import -> Maven -> Existing Maven Project. In the Root Directory field, browse and select the uknit folder you have just extracted in the eclipse workspace; click finish to import the project. Repeat the process to import the quickstart as the second Maven project.
Next create a Run configuration to run the uKnit. To do that, select the uknit project in the Project or Package Explorer and invoke Run -> Run Configuration and add New Launch Configuration for Java Application. Enter fields as follows and click Apply to save the configuration.
Main Tab
    Name: uknit
    Project: select uknit project
    Main Class: org.codetab.uknit.core.Uknit
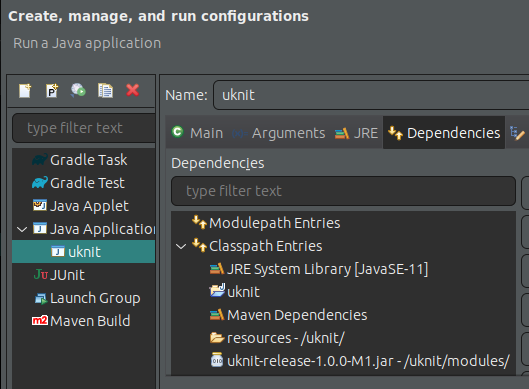
In Dependencies Tab, select Classpath Entries and use Add Jars to add uknit/modules/uknit-release-1.0.0-M2.jar. Next click Advanced and choose Add Folder radio, click OK and choose uknit/resources. The Classpath Entries looks as below,

Now run the uknit and it throws error “CriticalException: src file not found”, which indicates that installation is fine. In case of any other error, refer Troubleshooting section below.
Run Quickstart
The uknit project contains uknit.properties located under uknit/resources folder which configures the input java class file for which test has to be generated. Open the file eclipse-workspace/uknit/resources/uknit.properties and edit,
    uknit.source.base=/home/foo/eclipse-workspace/quickstart
    uknit.source.dir=src/main/java
    uknit.source.package=org.codetab.uknit.quickstart
    uknit.source.clz=Quickstart
The uknit.source.base is the absolute path to the quickstart project. In case your workspace is /home/m/eclipse-workspace where you have extracted the uknit release, then set it as,
uknit.source.base=/home/m/eclipse-workspace/quickstart
The classes and dependencies of quickstart project should be visible to uknit. For that, open the uknit project’s Build Path with Build Path -> Configure Build Path and under the Projects tab select Classpath and Add quickstart project. This adds quickstart project to the classpath of uknit. That completes the configuration.
Now run uknit through the Run Configuration created during installation, and if all goes well then test class QuickstartTest.java is generated under the folder quickstart/src/test/java/org/codetab/uknit/quickstart. Open the test class and hit Ctrl+Shift+O to auto import the required import statements which should resolve all the errors. Finally run the generated test class as JUnit test.
To generate tests for your project follow these steps,
- add your project to classpath using Configure Build Path as explained above.
- edit
uknit/resources/uknit.propertiesand set properties as,
uknit.source.base - set it to absolute path of your project in eclipse workspace
uknit.source.package - set it to package of the class to be tested
uknit.source.clz - name of class for which test is generated
Above config is good for Maven projects, in case your project is not a Maven project then see uKnit Configuration for details.
IntelliJ IDEA
To try out the uKnit, create a new Empty Project named tryuknit with project directory $HOME/IdeaProjects; extract the downloaded uknit-1.0.0-M2-release.zip in the project folder which extracts two folders uknit and quickstart. Alternatively, you can extract the zip in any existing project folder.
Next, add uknit as module with New -> Add Module from existing sources. In the Import dialog, choose the uknit folder you have just extracted and in the Import Module dialog choose Import Module From External Model and Maven; click Create to finish the import. Repeat the process to import the quickstart as the second module.
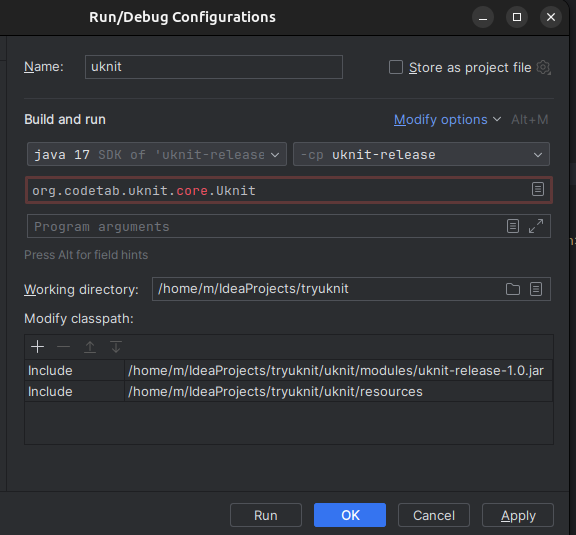
Next to create a run configuration, go to Run -> Edit Configuration and click + to Add New Configuration and choose type as Application. Expand Modify Options and enable/disable options as follows
    Enable - Use Classpath of Module
    Enable - Modify Classpath
    Disable all other options
If project directory is /home/foo/IdeaProjects/tryuknit then enter fields as follows and click OK to save the configuration.
    Name: uknit
    -cp dropdown: uknit-release
    Main class: org.codetab.uknit.core.Uknit
    Working Directory: /home/foo/IdeaProjects/tryuknit/uknit
    Modify Classpath: click + and add paths,
      /home/foo/IdeaProjects/tryuknit/uknit/modules/uknit-release-1.0.0-M2.jar
      /home/foo/IdeaProjects/tryuknit/uknit/resources

Now run the uknit and it throws error “CriticalException: src file not found”, which indicates that installation is fine. Go to Quickstart page to fix this error and generate the test. In case of any other error, refer Troubleshooting section below.
Run Quickstart
Here we use /home/foo/IdeaProjects/tryuknit as the IntelliJ project folder. Change it to the folder where you have installed uKnit release. The uknit project contains uknit.properties located under uknit/resources folder which configures the input java class file for which test has to be generated. Open the file /home/foo/IdeaProjects/tryuknit/uknit/resources/uknit.properties and edit,
    uknit.source.base=/home/foo/eclipse-workspace/quickstart
    uknit.source.dir=src/main/java
    uknit.source.package=org.codetab.uknit.quickstart
    uknit.source.clz=Quickstart
The uknit.source.base is the absolute path to the quickstart project. If uknit module folder is /home/foo/IdeaProjects/tryuknit then set it as
uknit.source.base=/home/foo/IdeaProjects/tryuknit/quickstart
The classes and dependencies of quickstart project should be visible to uknit. For that, open the uknit project pom.xml and add following dependency.
<dependencies>
	<dependency>
		<groupId>org.codetab.uknit</groupId>
		<artifactId>quickstart</artifactId>
		<version>1.0</version>
	</dependency>
</dependencies>
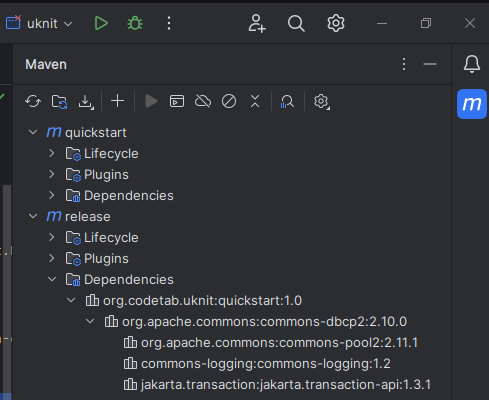
Next click on Maven button on right side tool bar to open the Maven tool window and click Reload to reload all maven projects. Now you should see dependencies of quickstart are listed under uknit project dependencies.

Run uknit through the Run Configuration created during installation, and if all goes well then test class QuickstartTest.java is generated under the folder quickstart/src/test/java/org/codetab/uknit/quickstart.
uKnit generated test class doesn’t come with all the required imports. Use IntelliJ Auto Imports feature to fix the imports. After fixing the imports, run the generated test class as JUnit test.
To generate tests for your project follow these steps,
- add your project as Maven dependency in
uknit/pom.xmlas explained above. - edit
uknit/resources/uknit.propertiesand set properties as,
uknit.source.base - set it to the absolute path of your module in IntelliJ project folder
uknit.source.package - set it to the package of the class to be tested
uknit.source.clz - name of the class for which test is generated
Above config is good for Maven projects, in case your project is not a Maven project then see uKnit Configuration for details.
Troubleshoot Installation
The run throws org.codetab.uknit.core.Uknit class not found error. This happens if modules/uknit-release-1.0.0-M2.jar is not in the classpath, resolve it as follows,
- Eclipse - check whether uknit-release-1.0.0-M2.jar is added to Classpath Entries as shown in the image.
- IntelliJ - check uknit-release-1.0.0-M2.jar is added to Modify Classpath as shown in the image.
The run throws Properties file not found error. This happens if resources folder is not in the classpath, resolve it as follows,
- Eclipse - Check whether
uknit/resourcesfolder is added to Classpath Entries as shown in the image. - IntelliJ - check
uknit/resourcesfolder is added to Modify Classpath as shown in the image.
If uKnit fails run and throws an error such as “Pb(390) The import org.apache.commons and Pb(2) BasicDataSource cannot be resolved to a type”, then it indicates that uKnit unable to resolve some type used by the class for which test class is generated. To generate the test class, uKnit parse the source class and tries to resolve the types used therein; Pb(390) error crops up when it is unable to find the a type. The error should be resolved once you properly add quickstart dependency to uknit as explained above.
- In Eclipse, add quickstart project as dependency in uknit project classpath in project Build Path.
- In Intellij, add quickstart dependency in uknit pom.xml and reload the Maven projects in Maven Tool Window.