uKnit Quickstart with Gradle
The preferred way to use uKnit is to add it as a dependency in your project’s build.gradle file. We explain the steps involved with uknit-quickstart example, and you can use uKnit in your project in the same way.
uKnit is also distributed as release zip which contains uKnit core and a Quickstart example projects. For whatever reason, you don’t want to add uknit dependency to your project’s build.gradle then you have to install uKnit from the release zip. Installation process is tad bit complicated, and it is explained in Install uKnit. We suggest you to stick with the easier option of adding uKnit dependency as explained below.
The uKnit Quickstart Project contains multiple branches main, maven, gradle etc., and this tutorial uses gradle build. The setup for Eclipse and IntelliJ IDEA are explained below, and the procedure is more or less same for other IDE.
In case you are interested in Maven build, then refer Quickstart Maven Build.
    uKnit needs Java 11 or higher, ensure that
    Java 11 or higher is installed in the IDE.
Eclipse
In a terminal, cd to your Eclipse workspace, and clone the uknit-quickstart project from Github.
    cd <your eclipse workspace folder>  # normally $HOME/eclipse-workspace

    git clone git@github.com:maithilish/uknit-quickstart.git
    cd uknit-quickstart
    git checkout gradle                  # checkout gradle branch
Don’t forget to checkout gradle branch after the clone; the main branch doesn’t contain any project!
Start Eclipse IDE and import the uknit-quickstart folder as a Gradle project with Import -> Gradle -> Existing Gradle Project. In the Root Directory field, browse and select the uknit-quickstart folder in the eclipse workspace; click finish to import the project.
Once imported, edit build.gradle.kts and update the version of uknit-core dependency as
    dependencies {
    api("org.codetab.uknit:uknit-core:1.0.0-M2")
    ...
From project context menu, refresh the project with Gradle -> Refresh Gradle Project. Open Gradle Tasks window and trigger Gradle build. Select the project in Package Explorer and use F5 to refresh the build folder.
To run the uKnit create a Run configuration. Select the uknit project in the Project or Package Explorer, and invoke Run -> Run Configuration; add New Launch Configuration for Java Application. Enter fields as follows and click Apply to save the configuration.
Main Tab
    Name: uknit
    Project: uknit-quickstart
    Main Class: org.codetab.uknit.core.Uknit
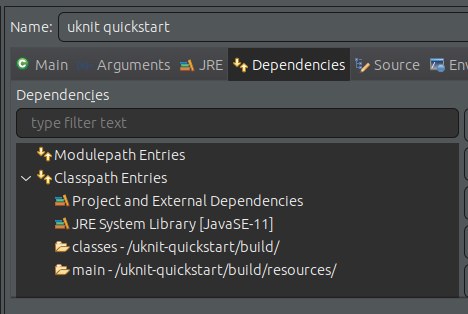
In the Dependencies tab, select Classpath Entries and remove the uknit-quickstart project. Use Advanced -> Add Folders option to add uknit-quickstart/build/classes and uknit-quickstart/build/resources/main folders to classpath. The Dependencies should look as below,

Now run the uknit and it throws error “CriticalException: src file not found”, which indicates that installation is fine. In case of any other error, refer Troubleshooting section below.
Configure uKnit
The uknit-quickstart project contains uknit.properties located under uknit-quickstart/src/main/resources folder which configures the input java class file for which test has to be generated. Open the file eclipse-workspace/uknit-quickstart/src/main/resources/uknit.properties,
    uknit.source.base=/home/foo/eclipse-workspace/uknit-quickstart
    uknit.source.dir=src/main/java
    uknit.source.package=org.codetab.uknit.quickstart
    uknit.source.clz=Quickstart
The uknit.source.base is the absolute path to the quickstart project. For example if your workspace is /home/xyz/eclipse-workspace where you have extracted the uknit release, then set it as,
uknit.source.base=/home/xyz/eclipse-workspace/uknit-quickstart
Again open Gradle Tasks Window and rebuild the project so that updated resource is copied to build folder.
Finally, run uknit and if all goes well then test class QuickstartTest.java is generated under the folder uknit-quickstart/src/test/java/org/codetab/uknit/quickstart. Open the test class and hit Ctrl+Shift+O to auto import the required import statements which should resolve all the errors. Finally run the generated test class as JUnit test.
To generate tests for your project follow these steps,
- Add dependency
api("org.codetab.uknit:uknit-core:1.0.0-M2")to your project’s build.gradle. - Copy
uknit.propertiesfile from uknit-quickstart toyour-project/src/main/java/resourcesfolder and update the properties; point it to your project source folder and package. Alternatively you can create a new file and add required properties as detailed above. - Create a Run Configuration as explained above but in Dependencies Tab - Classpath Entries add build/classes and build/resources/main of your project.
IntelliJ IDEA
Open a terminal, cd to $HOME/IdeaProjects folder and clone uknit-quickstart project from Github with,
    cd <path of intellij project folder>   # normally $HOME/IdeaProjects

    git clone git@github.com:maithilish/uknit-quickstart.git
    cd uknit-quickstart
    git checkout gradle          # checkout gradle branch
Don’t forget to checkout the gradle branch after the clone; the main branch doesn’t contain any project!
Start IntelliJ and add uknit-quickstart as a project with New -> Add Project from existing sources. In the Import dialog, choose the uknit-quickstart folder you have just extracted. In the Import Project dialog choose Import Project From External Model and Gradle; click Create to finish the import.
Once imported, edit build.gradle.kts and update the version of uknit-core dependency as
    dependencies {
    api("org.codetab.uknit:uknit-core:1.0.0-M2")
    ...
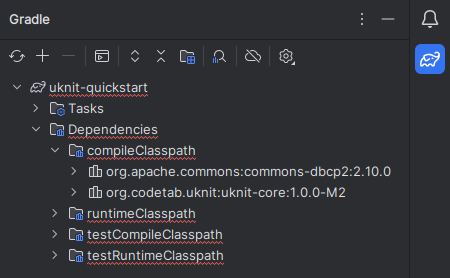
Open Gradle Tool window and trigger Gradle build and expand Dependencies and check whether latest version of uknit-core is reflected. Sometimes couple of reloads is required so that latest uknit-core version is displayed!

Next to create a run configuration, go to Run -> Edit Configuration and click + to Add New Configuration and choose type as Application.
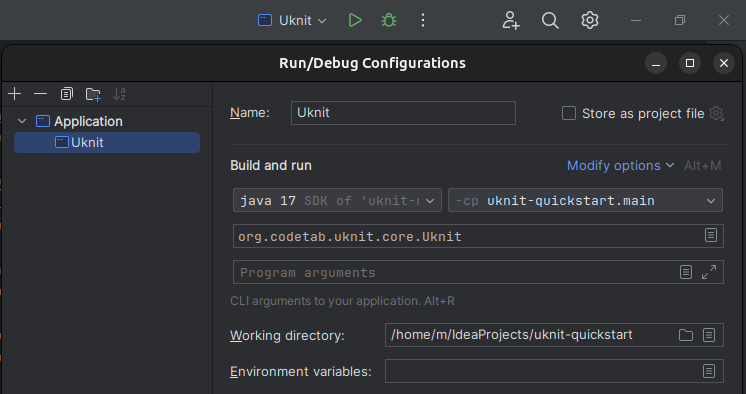
If project directory is /home/foo/IdeaProjects/uknit-quickstart then enter fields as shown below and click OK to save the configuration.
    Name: uknit
    -cp: select uknit-quickstart.main module
    Main class: org.codetab.uknit.core.Uknit

Now run the uknit and it throws error “CriticalException: src file not found”, which indicates that installation is fine. In case of any other error, refer Troubleshooting section below.
Configure uKnit
Here we use /home/foo/IdeaProjects/uknit-quickstart as the IntelliJ project folder. Change it to the folder where you have cloned uKnit-quickstart. The uknit-quickstart project contains uknit.properties located under uknit-quickstart/src/main/resources folder which configures the input java class file for which test has to be generated. Open the file uknit.properties,
    uknit.source.base=/home/foo/eclipse-workspace/uknit-quickstart
    uknit.source.dir=src/main/java
    uknit.source.package=org.codetab.uknit.quickstart
    uknit.source.clz=Quickstart
The uknit.source.base is the absolute path to the quickstart project. If uknit module folder is /home/xyz/IdeaProjects/uknit-quickstart then set it as
uknit.source.base=/home/xyz/IdeaProjects/uknit-quickstart
Open the Gradle Tool window and click Reload to reload the project. Run uknit and if all goes well then test class QuickstartTest.java is generated under the folder uknit-quickstart/src/test/java/org/codetab/uknit/quickstart.
uKnit generated test class doesn’t come with all the required imports. Use IntelliJ Auto Imports feature to fix the imports. After fixing the imports, run the generated test class.
To generate tests for your IntelliJ module follow these steps,
- Add dependency
api("org.codetab.uknit:uknit-core:1.0.0-M2")to your project’s build.gradle. - Copy
uknit.propertiesfile from uknit-quickstart toyour-module/src/main/java/resourcesfolder and update the properties; point it to your module source folder and package. Alternatively you can create a newuknit.propertiesfile and add required properties as explained above. - Create a Run Configuration as explained above but in -cp field select your project.
Troubleshoot Installation
The run throws org.codetab.uknit.core.Uknit class not found error. This happens if org.codetab.uknit:uknit-core:1.0.0-M2 dependency is not in the classpath, resolve it as follows,
- add
api("org.codetab.uknit:uknit-core:1.0.0-M2")dependency to project’s build.gradle.
The run throws Properties file not found error. This happens if resources folder is not in the classpath, resolve it as follows,
- Eclipse - open project context menu, use Gradle -> Refresh Gradle Project and then, build project in Gradle Task Window. It can also happen if resources folder is not in Run Configuration -> Dependencies -> Classpath Entries.
- IntelliJ - open Gradle Tool Window and reload the project.
The run throws src file not found error. This means you have not updated in uknit.source.base property in uknit.properties. Set is as follows,
- Eclipse - if your eclipse workspace is
/home/xyz/eclipse-workspace/uknit-quickstartthen set uknit.source.base=/home/xyz/eclipse-workspace/uknit-quickstart. Do a Gradle rebuild. - IntelliJ - if uknit-quickstart is cloned to
/home/xyz/IdeaProjects/uknit-quickstartthen set uknit.source.base=/home/xyz/IdeaProjects/uknit-quickstart. Do a Gradle rebuild.
The run throws IllegalStateException: invalid environment settings. This happens in Eclipse IDE if uknit-quickstart project is not removed from Run Configuration -> Dependencies -> Classpath Entries.