9.2. Google Webmaster Tools
In the previous section, we linked WordPress to Google Analytics to analyze the traffic. Earlier we also configured WordPress SEO for search engine optimization. While, these two tools greatly help us to optimize and analyze the site performance still there are many areas that are not covered by them. In this section, we use Google Webmaster Tools to analyze the site further.
Google Webmaster Tools cover following aspects:
Submit Sitemap to Google.
Know the indexing status and stats.
Analyze search traffic - queries and top pages.
Keywords indexed by Google.
External links and internal links of the site.
Issues with Structured Data.
Author stats.
Crawl errors and Crawl stats.
Security issues.
Login to Google Webmaster Tools, using a Google account and then to get started, enter the site URL and click Add Site.

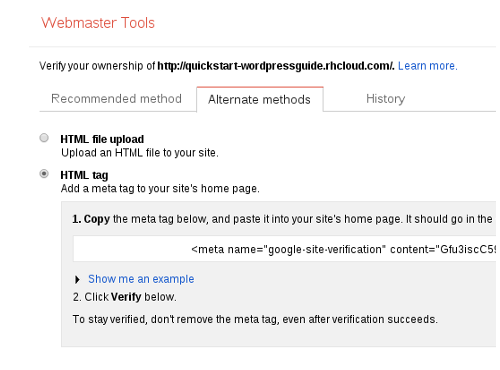
It takes us to Verify screen where we need to choose Alternate Method tab. Out of the four choices, select HTML tag method. Copy the displayed meta tag to the clipboard.
In a new browser tab, open WordPress Admin Dashboard and go to WordPress SEO Dashboard. Scroll down to Webmaster Tools and paste the meta tag into Google Webmaster Tools field and save the changes.
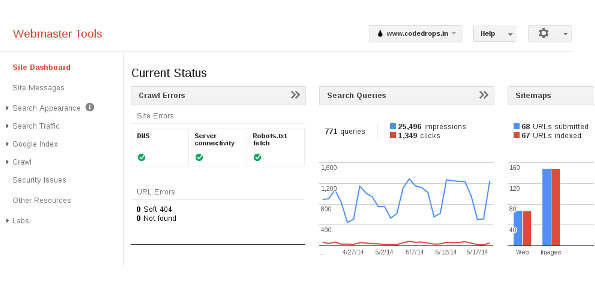
After that, switchback to Google Webmaster Tools tab and click Verify. Webmaster Tools verifies the site and outputs a success message. After verification, when we open Webmaster Tools, it lists the added sites. Select a site to open the dashboard.

Time Lag
In Google Analytics, we are able to view real-time data immediately and historical data after a few hours. It is a different matter when it comes Webmaster Tools; update may take days, weeks, or even months for certain items as Google goes through billion of web pages on a daily basis, collate data and then publish the data to Webmaster Tools.
As usual, we do not get into a detailed discussion on each and every feature offered by Google Webmaster Tools. Refer Webmaster Tools Help Center to learn more about it. However, we cover a couple of important feature to get started.
Sitemap
When the site is production ready or it is live, then the first task is to submit Sitemap to the Google so that it can start indexing the site.
When activated, WordPress SEO Plugin generates the sitemap, and it also updates the sitemap whenever we publish a new post or page. To submit the Sitemap, we require its filename and for that, go to Dashboard → SEO → XML Sitemaps and click on XML Sitemap button to open the sitemap and note down the Sitemap filename.
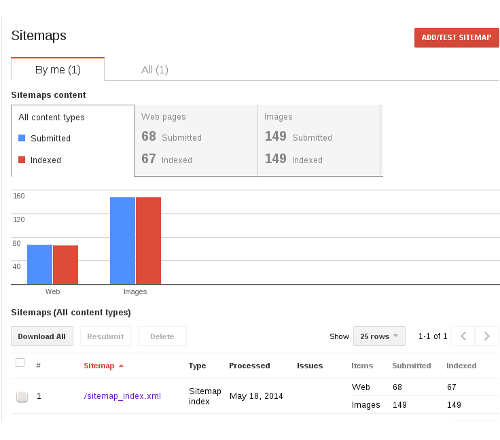
After that, go to Google Webmaster Tools and expand Crawl in the left menu bar and select Sitemaps. Click Add/Test Sitemap and enter sitemap filename and click Submit Sitemap.

To get indexed, for new sites it may take up to a week. Sitemap page and Index Status page shows the number of pages and images indexed by Google.
Structured Data
Another item to check is whether there are any errors in Structured Data of pages. Go to Search Appearance → Structure Data to view stats about pages with structured data and errors.
If there are errors, use Structured Data Testing Tool to understand the problem and rectify.
Crawl Stats and Errors
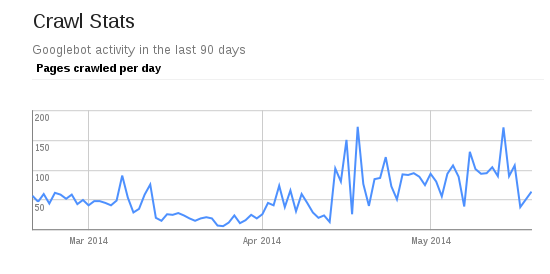
Search engine bots frequently crawl the site. Crawl Stats shows stats about the bot’s activity - No. of Pages crawled, Kilobyte downloaded, and Time taken to download a page.

We need to go through these stats regularly and take appropriate corrective measure when Time taken to download a page shoots up beyond a level. Due to issues either with the server or W3 cache setup, response time may increase. When unresolved for a long time then it may impact the search ranking.
Crawl Errors displays DNS errors and missing pages. Drill down through the missing page to understand the core issue. After resolving the problem, mark it as fixed in Google Webmaster Tools.
Important
Go through Google Webmaster Tools regularly and in case of errors, take corrective action as soon as possible to avoid ranking downgrade.
All the improvements suggested in last few chapters should help us to get more traffic. In the next chapter, we describe the procedure to import static pages to the WordPress.